My favourite blogs

Saturday, 24 September 2016

Helping a friend with her project

A good friend decided to make a quilt for her one year old grandson. Although she is excellent at needlework, making a quilt was relatively new to her. 

Using Klona cotton fabrics from Backstitch at Burwash Manor Farm here in Cambridge she put together these stunning colours to make a 'courthouse steps' design with a large central square. My friend came for help with the quilting as she felt her machine was not up to the job.  I awarded her 10/10 for her basting and after a quick practise, machine quilted with my walking foot, stitching in the ditch style. 


The quilt really didn't need much embellishment but inspired by one of my quilts on the wall, she decided to quilt a 'wonkey' five pointed star in the centre of each square. She used a 30s variegated thread by Mettler. 


The photo shows a close up of the star being quilted and the remaining photos are close up of other blocks.....


I love Klona cotton because the colours are amazing. Don't you just love this bright scarlet? The fabric comes in a decent width and has a good 'body' to it making it very robust for making a quilt that with be used and used. If you don't know it already here are photos of Backstitch showing the exterior and the huge stock inside.


Saturday, 17 September 2016

Bramble Patch Box of Delights

I've always been a big fan of The Bramble Patch shop in Weedon, Northamptonshire.  I've been to several courses, visited exhibitions, bought fabric and even had a few quilts long arm quilted there.  I've never been short of quilting ideas/project but I thought I would join their new initiative called the Bramble Box of Delights. 

You may have seen this idea on the internet from the USA where a patchwork shop will send you a box every month with fabric, perhaps a pattern or a new tool.  The plan is that you will be inspired by what they send you.  The snags with the USA companies are the high expense of postage, the exchange rate not to mention VAT and customs complications. One well know company is called 'The Quilty Box' which is very popular.

 Bramble Patch decided to do their own box and I was pleased to sign up in early August. They are a very well stocked shop and often produce their own patterns so I felt this might be something to give me a new challenge every month. I got a free month by signing up so early and they promise that the contents will always be worth more than the subscription cost. 

So, on the 2nd September this arrived.......


and inside I found......


So in my 'Box of Delights' I found a Moda charm pack with fabric called 'Grand Traverse Bay' designed by Minick & Simpson. It's gorgeous with blue with cream and sand coloured traditional prints inspired by the blue water and sandy beaches by Lake Michigan.  There was a fat quarter called 'Twist' by Dashwood Studios, some 50s silk-finish thread by Mettler (always wanted to try this thread), a measuring gauge to check those  1/4" seams and a pattern to use all of the above to make a cutting mat bag. 


I don't think I will be making the cutting mat bag with the charm pack squares as I already have something to take my A3 mat here and there. But that's the exciting bit...to be inspired to go somewhere new. 


Friday, 9 September 2016

Cambridge Quilters Chairman's Challenge 2016 Mark 2

I described in a previous post how Cambridge Quilters are set a challenge each year by our Chair. We don't have to join in but it's a great way of getting to know other members. I wrote about the set of Egyptian themed place mats started by me which went around my group.  I thought it would be a good time to show what I made for the other members in my group....

Elaine's bag contained a batik jelly roll and she requested the blocks came out at 12" (finished).  With a good eye for putting colours together Elaine made her first block. 


So, here is the block I made for Elaine. Not too hard then? 


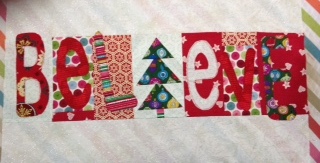
The next bag proved to be a bigger challenge....there was a Christmas theme with the idea of making a lap quilt.  With quite a few design ideas to choose from I decided to tackle this one. It was quite big at 22" x 12".   I first had to create the 'background' and pieced together several fabrics. The Christmas tree in the centre was foundation pieced. 

 Then I drew all the letters using the Techsoft 2D tools drawing programme. I printed them out, fiddled with the sizes and finally cut them out of fabric using Bondaweb. After some careful appliqué I was done. Phew, that took a while. 


In the next bag, I found a maritime theme and the bag owner had started off stitching these beech huts. Red, white and blue fabrics were requested on a sort of 'shabby' background which was provided. 


The next person in rotation made this light house! No pressure then! 


I decided to keep things simple and researched maritime flags. The design of the flags have a meaning but these were rather random. So this is my contribution......


and here is a close up of me free machine stitching it. I used some vilene to support the fabric and used a hoop for tension.


The next bag, from Jane, proved to be an even bigger challenge. Jane asked for circles and she had made an amazing New York Beauty block which I now regret not photographing. I knew that it was possible to make a 'log cabin' block which, when you make four, will look circular. I struggled to make this design down in scale to make a 12" block so I just had to make four. I think Jane plans to make this the centre of her final quilt. Isn't log cabin versatile? 


The last bag proved to be very different from all the others. On opening the bag I found recycled denim, pink appliqué, buttons and the like. All very 'casual' for want of another name. So I decided to improvise and made a series of corded pin tucks, stitched lines of built in embroidery patterns and added some 'rough and ready' appliqué. I then added pink buttons to complement the pink fabric used on a other block. 


I have so much enjoyed each and every mini project and when we all got together to return the bags and contents to the original owner everyone seemed pleasantly surprised, if not amazed, by the results. I know I was. 


As I write I hope the others in this group are well on the way to completing their quilts which should be ready for the big reveal next January. I wonder what our next challenge will be? 


Friday, 2 September 2016

Let's Face it - Binding a quilt isn't always the best option.

TUTORIAL 

How to put a facing with a built in sleeve case on an art quilt or embroidery


Sometimes when you make a quilt, especially a small one, adding a binding, even a narrow one, just isn’t the right thing to do. This is especially true if, like me, you make ‘art’ quilts or small embroideries which are intended to hang on a wall or be framed. So this is the  illustrated tutorial of how I do it.

First of all, you make the patchwork or whole cloth top; quilt through wadding to a backing fabric as you wish then trim the edges to square it up. Press or starch as required.


For the facing, I try to use a fabric that has some ‘body’. My samples were made with Klona cotton from Cally Co in Cambridge.  Backstitch at Burwash Manor Farm also stocks it. I used the same colour as the quilt back but this isn’t compulsory. 

This method is not that hard to do but writing down instructions makes it look more complicated than it is.  I hope the photos help. 

My art quilt was 20” square. You need to decide which way up it will viewed and we start working on the two ‘sides’. That is the right and left.

I want the facing to finish 4” wide.  If your piece is small, make the facing narrower. Scale it as you feel best, no one will be checking.


Step 1: Cut two pieces of facing fabric 5” wide and 24” long (remember by sample is 20”).  On one of the long edges press over ½” or less and give it a good press. You may need steam. Top stitch this folded pressed edge. I always top stitch with a slightly longer stitch length than normal because garments are always top stitched like this. Remember to move the needle position far left otherwise you will be sewing into nothing. 


Top stitch #10 foot on the Bernina, needle moved to far left
 #5 foot will be OK or even use a zipper foot. What ever you need to get close to the edge. 


Step 2: Pin the facing to your quilt. Press if desired. Tack if desired. Make sure the top edges line up. The photo shows the facing the wrong side up. and you can clearly see the turned back/topstitched  edge at the bottom. 


Step 3: Using a patchwork foot or even a walking foot, stitch the facing to your quilt. Use a 1/4 inch seam allowance.


Step 4: Press as you go, turning over the facing and quilt and top stitch the facing.  All right sides up. Again, use a  #10 foot with the needle position far left.


Step 5:  Turn everything over and this time encourage the quilt to turn over slightly to the back. This is the tricky bit and you will need to press this very carefully. I use steam to make it stay down. The close up photo now shows me pressing the reverse of the quilt. You can just make out the top stitched edge by the tip of the iron.


Step 6: Now turn everything with the right side or quilt side on top. You can see the excess facing which can be trimmed off.  On the wrong side, hand stitch the long side facing to the back of the quilt.


Cut off this excess facing


Repeat all steps for the other side. 

Step 7: Now for the bottom edge of your quilt.  Cut another facing strip, 5” wide and 20” long. Press and top stitch as before. Attach to the bottom edge of the quilt, press and top stitch just as before. You may wish to machine on a label now. 

The only difference here is that instead of trimming off the excess facing (as in step 6) you tuck it in carefully before hand stitching the facing down.  This needs to be done neatly as there is a lot of bulk at this point.  

Snip a little of the wadding away if needed.  The gap between the edge of the bottom facing, where it meets the side facing, will need to be closed with some slip stitches. It will be obvious when you get there. 

This photo shows the reverse of the quilt to the left hand side where the facing has been tucked in ready to be hand stitched in place. 


Step 8:  Basically you do it all over again for the top edge of the quilt. BUT, make the facing longer and deeper. Mine was 6” wide and 28” long. Repeat all the steps. However, as the excess facing is tucked in, let it remain quite wide within the facing/sleeve so that it doesn’t get in the way of a hanging rod. 

This time, you do not stitch up the gaps between the facing and the quilt otherwise you would not be able to insert a hanging rod, etc. Again, it’s quite obvious when you get there. This close up photo shows the top facing with the space created to fit a hanging bar.  


This photo shows the label which I machined in place at step 7. You could leave this to the end and hand stitch a label in place. Being lazy, I machined it down. 

Next is one of the blocks I made for my series of samples.


Here is another of the blocks I made. Using a 'wonky' log cabin technique; I did draw the designs first and used a foundation piecing method to ensure the blocks were exactly as they were on paper. 

Finally, here are all the four panels on display during my July Open Studio. Not a great photograph but they did look good together in my marquee.