My favourite blogs

Friday, 29 April 2016

Cambridge Open Studios Artists unite to support the New Arthur Rank Hospice Charity

Before Christmas I was contacted by a lovely lady called Mary Phenna who is the main fund raiser for the new Hospice which is being built in Cambridge. The old hospice has 12 beds but the new one will have 24 beds and many improved facilities for patients, carers  and visitors. Mary asked me if Cambridge Open Studios Artists might help raise money for this project. Of course we would....

The plan is that every participant in Open Studios 2016 will decorate or create a heart to have on display in their studio. Eventually, the hearts will be auctioned to add to the total amount needed to build the new hospice.  The new hospice will cost £10.5M and to date £7.7M has been raised.

So, not to hang about, I thought I would make a start on my contribution. My first idea was to make a machine embroidered piece to wrap around the heart template. Then I thought, why not make some sort of piece to hang on a wall. Hence, the plan to make a pin wheel quilt.
Delving into my fabric collection I found this set of pink fabrics. Perfect! I cut them up into 5 1/2" square, added some white ones then stitched them altogether in a heart shaped arrangement. Sorry the photo is somewhat out of focus.  A border in white fabric is added to finish the base.
It's a bit hard to see but on the intersection between the squares I have laid down my 'twister tool'. This is a perspex template with crossing lines in the centre. You then cut out the square very carefully.

This next photo shows the base fabric without the piece I've just cut out. This action is repeated until you have cut out all the squares. The squares are reduced down to 3 1/2"  This is a somewhat wasteful technique but the results are worth it.
Phew, tricky cutting! 
This is what I'm left with! Might save all the small squares.........
Here, I've laid out all the small squares in order.  Each one is turned a few degrees to the right.  You  must be careful doing this otherwise you can end up with no clue where they all go! 
So, row by row, you stitch all the small squares together. I used my very ancient Singer machine which was a gift from my parents in 1974. It turns out it does a perfect 1/4" seam with the normal presser foot. Nothing special required. 
   
And a close up
 Eventually, they are all stitched up then each row is put together and a border added. 
I then went onto do the quilting. I decided to quilt the centre heart area in pink thread with an open vermicelli free machined line. The white areas were quilted with white thread but with  denser stitching. 

Here is my finished piece. It's about 24" square. It does not have the usual binding as I decided to finish each edge with a facing. I will explain how to do a facing in my next blog posting. 

 I'm quite pleased with the end result. Come and see it in person during Cambridge Open Studios this July. 

I couldn't end this blog posting without a photo of my trusty old Singer. it still works as good as the day mum and dad bought it for me. 


Saturday, 23 April 2016

Felted notebooks

A busy week which started with me deciding to make some felted notebooks ready for Cambridge Open Studios in July.  You may have seen machines that can do needle felting or 'embellishing'.  I used to have one at my old school. I thought a separate embellishing machine would be one machine too many in my studio so I bought the attachment for my trusty Bernina. Here is a photo of the box. It was a bit pricey but it does the job very well. 

You need to fit the attachment, which includes a different throat plate, remove the rotary hook and bobbin, leaving the front of your 'bobbin area' open. Fluff does collect there but it's no problem since I clean and oil my machine very frequently. The needle array consists of five barbed needles which punch through fibres and yarn. 


So, I found a ball of soft roving, teased it out and began embellishing it onto some felt I made last summer.  


Here's a close up of starting. See how I've arranged the roving to spread it out.

Here I've created a little loop to punch into the base fabric. I often hold it down with a kebab stick so that my fingers don't get in the way!


Another view of my piece as it starts to come together......


Sometimes you can get quite thick, lumpy areas. If you are not careful you can overdo the felting and simply make a hole in the base fabric. This photo shows me laying some old cheap netting over the area. This helps to keep everything flat and stable until it's felted down. The net is thrown away afterwards. 


Eventually, I am finished and I trim my newly embellished fabric and cut it down to cover a small notebook. This photo shows me using invisible thread to stitch down one of the inner flaps. (I hate hand stitching!)


A button is added to the front with some linen thread and dangly beads and I'm done. I made 12 notebook covers in one afternoon. They will be for sale at my Open Studio Event in July.


The next project is working on something for the Arthur Rank Hospice Appeal.


Saturday, 16 April 2016

Amazing artist Delia Cecil visits Cambridge Quilters this week


The meeting room was packed last Wednesday evening for the talk from Delia Cecil.

 Delia has been stitching and making textile art for over twenty years, She lives on the suffolk coast and it is clear from her work that she is inspired by nature, especially the wild life she sees around her.

Delia exhibits with a mixed media group called 'Running With Scissors'. They have exhibited at The NEC amongst other places. Delia has won awards for her work and featured in several magazines. 


Like many of us, Delia started making bed quilts but moved onto designing and making pictorial wall hangings. She uses appliqué with free machine embroidery. The triptych  below is called 'Leiston Abbey Ruins', Delia has layered organza with lace and cotton fabrics on a linen base. Stitching comes next followed by using a hot gun to burn away synthetic fabrics to revel underneath layers. 


Delia's latest work uses natural dyes sources from hedgerows, Fabric is steamed and printed with  leaves. The feathers are sun printed.  This form of eco printing was inspired by a book called 'Eco Colour' by India Flint. 


Delia does not use commercially printed fabric at all.  The leaf prints she obtains on her fabric are very subtle giving delicate  designs on the background of the fabrics. In the quartet of bird pieces below you can make out these prints. 


Next, close ups of the birds.......this one is 'Bossy Bird'. Isn't he gorgeous? 


Delia has appliquéd the bird then added machine stitching and small hand stitches. 


The detail on this lovely bird is exquisite. Again, the bird is appliquéd with the raw edge method then enriched with machine work and hand stitching. You can make out the long hand stitches, in cotton perlé. The birds are very well observed and the knack of capturing them in thread is knowing when to stop.......this piece is particularly stunning to see 'in the flesh'. 

I think it is fair to say that the whole group were blown away by Delia's work. She is a very modest, yet talented person who inspired us all. 

You can find out more about Delia from her website: http://www.deliacecil.co.uk/


Delia went onto lead a workshop on making sea holly with Lutradur and metallic threads and I plan to post any photos when I can. 


Sunday, 10 April 2016

Commission with Kaffe Fassett Fabric Part One

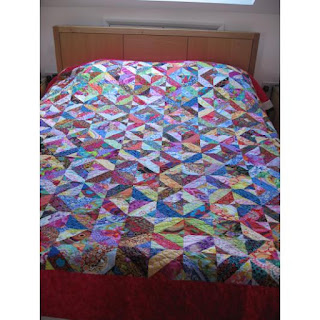
When I first started quilting I decided to make a bedspread for my own bed. I knew very little about patchwork and quilting at the time but rather liked the look of Kaffe Fassett's fabric. 

Back then, 'Jelly Roll' packs were quite new to the market - these are strips of fabric cut 2.5" wide across the width of the fabric. In a pack you get about 40 strips of reasonably coordinated fabrics.  So, I set about stitching two strips together, then putting two sets of two strips together. 

After much work, you get a nice pile of 'flat tubes' which you then set about cutting them up with a triangular  ruler, As you open up all the cuts you get sets of squares with all four fabrics. After doing this rather a lot of times you get to stitch them all together to make your quilt. As I had a job at the time, I think the process took me almost three years, on and off. Here's the end result:


I put all the individual squares together as the feeling took me, I did not attempt to put the units together in 'fabric groups' simply going for a light/dark contrast. 

I added a pink border and took it to be long arm quilted at The Bramble Patch

Here's a close up: 


Coming now to last summer, I was asked to make another one!  I can't mention the name of the client or the future recipient right now but I bought the fabric at Festival of Quilts at NEC last August.  By the autumn I thought I better make a start.  So from this pile of strips I made almost 300 small blocks. What with the pressing, stitching and cutting, this took me 11 hours. I used five jelly rolls in total. 


A heap of fabric strips
One unit out of almost 300
. This week I set about putting all the units together to make this pile of 72 10" squares.  Nine hours work. 


This time I decided to keep the blocks together by putting together units made from the same fabric.  I now have enough blocks to make a double bedspread 8-10" blocks x 9-10" blocks. 


I think a border won't be needed this time but I have made the binding for when  it's all quilted. The binding is 2.5" wide and made out of the same 'marble' print in several colour ways. 


Looking ahead, I'm preparing a tutorial for the May meeting of Cambridge Quilters. More of this another day.


Monday, 4 April 2016

Animal Quilt


Wandering around the Duxford Quilt Show recently I was drawn to a panel of animal prints. I thought my grandson might like this especially as the colour orange was much in evidence. Despite my promise to myself not to buy any more fabric-well I couldn't resist could I?


Big bits


Smaller bits


Sebastian trying out the finished quilt/wall hanging. Note how his jumper coordinates so well with the quilt. He's demonstrating how to be a baby!


I decided to go for a quite simple method of quilting so I did some free motion quilting in a sort of 'scribbling or loopy effect'. I quite deliberately stitched over the lines to achieve a more casual look.  I made a narrow binding, stitched on using the usual method with mitred corners. I quite enjoy hand stitching the binding on.


The finished quilt, approximately one metre square